Edging And Waxing Your Snowboard And Skis - An Amateur's Guide

If you're skiing or snowboarding for more than a week a year, it's probably a good idea to learn the basics of edging and waxing your gear. And before I progress any further, the disclaimer to this article is that I'm very much an amateur at both but I've picked up tips and skills over the years from friends (thanks mainly to Steve G!) and online videos. I've been edging and waxing our 'boards since our season in Banff in 2007 and any of our friends' boards who trust me to have a go. Sometimes there may be too much damage or a base grind is needed, so occasionally I'll get a pro to tune our boards. However, this article is designed to teach you to keep your skis or snowboards in great condition between shop visits.
Gear required
- Waxing iron (you could use an ordinary iron just make sure it doesn't have steam holes on the base). I have the Dakine iron.
- Wax to suit temperature conditions.
- Wax scraper.
- Some sort of base cleaner. There are differing opinions on base cleaners and whether they dry out your base so use what you feel comfortable with. I've used methylated spirits or even a spray bottle with a water/cleaning vinegar mixture in the past.
- Dish washing scourer - the nylon ones (usually green) not the metal ones!
- Edge tool (with file and possibly some diamond stones. I have three stones - course, medium and fine) and if you really want to get fancy a separate base tool. I just use my edge tool to do my base edge (if required - you don't need to do the base as much as the side in my experience). I've just purchased the SKS Multi Tuner and I'm pretty happy with it.
- A normal medium-cut file and a soft (grey) gummy stone.
- An old sheet to collect the metal filings and scraped wax.
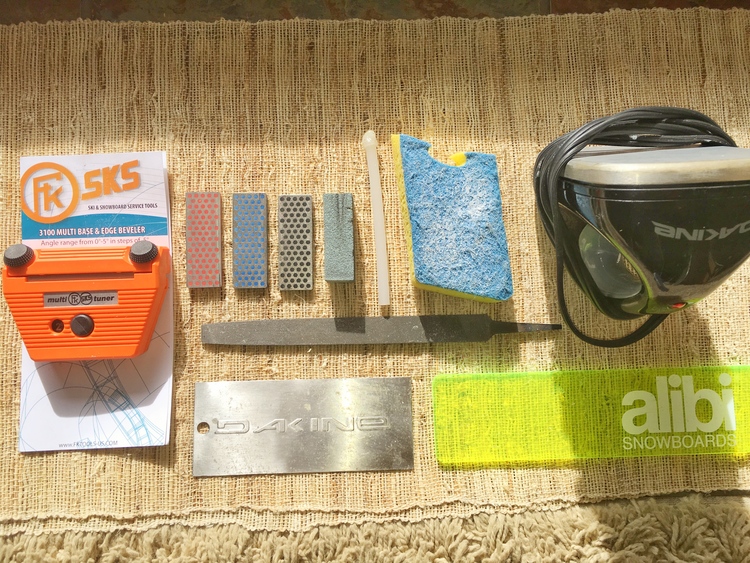
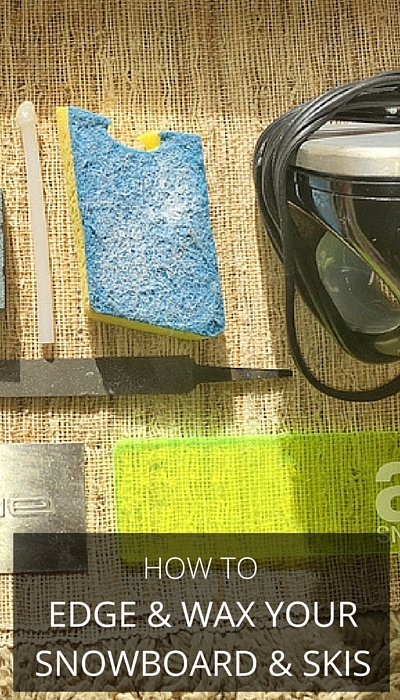
my Tuning Kit

Top left to right: tuning side/base edge tool with file inserted, diamond stones (fine, medium, course), gummy stone, p-tex stick, nylon scourer, waxing iron.
Middle: medium-cut file.
Bottom left to right: metal scraper, plastic scraper.
Optional gear for more advanced repairs
- Metal scraper.
- P-Tex and lighter (for filling in large gouges. For now, we'll concentrate on edging and waxing and I'll add this section later on).
- Work stand - I wish I had one but my nomadic life doesn't allow me to carry one around. I've made do with plastic tubs (turned upside down), strong cardboard boxes, chairs and even car tyres. As long as you can access the edges, and you’ve got someone to hold your board or ski, you can make-do without a work bench. If you have the luxury of having a bench then even better!
How to section
I like to attend to the edges before waxing. Sometimes the edging tool can scrape off some of the wax so it makes sense to wax after edging.
Edging
- Remove any burrs or deep nicks with the file. If the edges are relatively undamaged, use the gummy stone to clean them up a little before hitting with your edge tool.
- Always make sure that the file is positioned in the edge tool in the correct direction before starting (most files will have an arrow).
- If the base edge looks good, leave it alone. If it needs attention, run the edge tool at the appropriate angle (for the base I always use 1° but the side angle may vary - see 'Angles' section below), tip to tail (I always like to file in the direction of travel - personal preference). Place one of the finer diamond stones in your edge tool and finish off. Don’t get too carried away with the base.
- Now hit your side edges. You’ll most likely feel a lot more material coming off the side edges than the base. As a general rule, I’ll make 3 passes with the file, tip to tail. You may need more depending on the state of your edges. Again finish off with a finer diamond stone.
- Detune - if you have a camber or hybrid board or skis, you may want to detune the contact points. Detuning will stop the board feeling too ‘grabby’ (like it wants to catch an edge), but won’t have too much of an impact on carving or turning. Some park rats like to detune the whole board. If you have a rocker (aka banana), you probably don't have to detune at all (I don't on my LibTech TRS Banana).
- Finally run the gummy stone over the base edge and then the side edge, tip to tail, to remove any micro-burrs. Always finish on the side edge.
Here's a pretty good video on how to edge and detune your board or ski.
Waxing
- Scrape off any burrs (from hitting rocks, etc.) or lumps of old wax. The plastic wax scraper might not be enough so carefully use the metal one if required.
- Clean the base with the base cleaner (if you're comfortable with using a base cleaner) and a clean rag or strong paper towel.
- Heat up the iron and drip wax on the board or ski. Concentrate on the edges (these are your main contact points). Iron in the wax in a circular motion, spending enough time in an area so you just feel the heat coming through the other side (the top side) of your board or ski.
- Let your board or skis cool right down before attempting to scrape.
Scraping
- Some people don’t bother scrapping or smoothing off the wax. I’ve tried both, and whether it’s psychological or not, I feel better if the bottom of my board is smooth before hitting the slopes.
- Gently run your plastic scraper, tip to tail, making as many passes as needed to smooth your base out. Don’t take too much wax off or you’re defeating the purpose of the whole exercise.
- Now take your dish scourer and run it in one fluid motion from tip to tail to really finish off the job.
- Stand back and revel in the marvel of a freshly waxed board or ski! I may be a little strange but I just love the smell of freshly waxed gear and it get’s me amped to shred some lines!
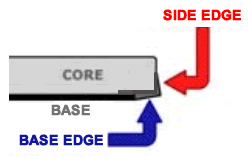
Angles
I've only recently started playing around with the angle of the base and edges and although overlooked, it's probably something I should have been aware of from the beginning. Here's a quick summary of setting the edge angles:
- Set your base edge at 1° with your base tool (if you have one) or set your edging tool to 1°.
- Select the overall edge geometry that you want, i.e. the difference between the base and side edges. For example, a neutral geometry would be 90°, so the base edge and the side edge are set at 1°.
- Once you've selected the geometry, set your edge tool at the correct angle and file your side edges.
How do you select the overall edge geometry?
Determining which overall geometry is best for you is really a bit of trial and error. Start with a neutral setup and then start experimenting. Remember to always start with a 1° base edge - you're only going to play with the side edge angle. As a guide, try following this:
Neutral
A 1° side edge angle will give you a 90° angle for the edge geometry.
Pros: neutral, with no nasty surprises. Ideal for beginners and intermediates, and advanced skiers and boarders wanting a neutral feel.
Cons: does not perform that well on hard snow or ice. May not be aggressive enough for advanced riders.Standard
A 2° side edge angle will give you a 89° angle for the edge geometry.
Pros: better performance on firm snow and ice, with more planted edge hold, and the potential for slightly more speed. Ideal for all skiers other than beginners.
Cons: might be a little too responsive for beginners.- Advanced
A 3° or greater side edge angle will give you a 88° or less angle for the edge geometry.
Pros: excellent grip on firm snow or ice.
Cons: needs more aggression to engage the edge but once you do it really hooks up. Not really suitable if you just want to cruise the mountain.
Conclusion
It might seem like a lot of info but once you tune your own gear a few times you'll easily get the hang of it. There's definitely a sense of achievement and satisfaction in tuning your own gear and it adds to the enjoyment and excitement of your riding. Don't be scared and have a go - worse case you'll need to take your gear to the shop to get it fixed. But keep in mind you were going to have to take it to the shop anyway for a tune!
If you have any tips, suggestions or questions, please leave a comment below. In the meantime, get out there and rip it up on your freshly tuned gear! (Make sure you click on 'subscribe via e-mail' to be notified when we write back).
Mick
Save this on Pinterest! Just hover over the image below and click the Pin It Button.
Disclosure: Some of the links in this article are affiliate links, and at no additional cost to you, we may earn a commission if you decide to make a purchase. We only recommend products or services that we use personally and believe will add value to you.
Jen spends most of her time following Mick around the mountain, often unintentionally off jumps and cliff drops. Currently on a mission to prove that you’re never too old to try freestyle. Aside from snowboarding, a little obsessed about tattoos, CrossFit, saving animals, learning to play the guitar and clean eating. Web designer and digital marketing nerd.